Welcome to your mobile camping kitchen! Whether you’re in the wilderness, camping by the beach, or simply enjoying the freedom of life on four wheels, your camping kitchen is the heart of your adventure. Here, you’ll whip up delicious meals, prepare refreshing drinks, and have everything you need for cooking and enjoying on the go within reach.
In this section, let’s take a closer look at the three essential components of your camping kitchen: the camping stove, the sink, and the refrigerator. We’ll show you how to cleverly integrate these elements into your camper so that you’re always well-equipped on the road. From delightful meals in nature to practical dishwashing and food storage – your camping kitchen makes it all possible. Let’s dive in and discover how to make the most of your mobile kitchen!
The Camping Stove
We’ve integrated our compact camping gas stove into a pull-out drawer in the bed, optimizing space in the living area and allowing for convenient meal preparation. However, it’s crucial to emphasize that when choosing a camping stove, ensure it is approved for indoor use. This is not only important for safety reasons but also saves you potential trouble with regulatory checks.
One of the advantages of this approach is that you can do away with large gas cylinders. This not only simplifies maintenance but also makes the installation of the camping stove much more straightforward. Typically, you’ll need small, handy gas cartridges that you can easily store and replace.
It’s also essential to note that you probably don’t need a massive kitchen in the camper unless you plan to cook exclusively in the vehicle. If you enjoy dining out occasionally or relish cooking amidst nature, a compact camping stove often suffices. This way, you can prepare your meals when you want to and still have the flexibility to dine outdoors.
The Sink Installation
Installing a sink in your camper is a crucial step to enhance the comfort and functionality of your camping kitchen. In this section, we’ll show you how to install a sink with fresh water and wastewater containers, a faucet, and a 12-volt submersible pump in your vehicle with relatively simple steps.
Step 1: Preparation Before installing the sink in your camper, careful preparation is crucial. You need a suitable location in the cabinet where the sink can be placed. Ensure that the area provides enough space, and the cabinet floor is sturdy enough to bear the weight of the sink and water.
Step 2: Gather Materials and Tools To install the sink, you’ll need the following materials and tools:
- Sink (with drain)
- Freshwater container
- Wastewater container
- Faucet (with integrated automatic feature or a separate on/off button)
- 12-volt submersible pump
- Hoses and pipes (for fresh and wastewater)
- Screws and fastening materials
- Drill and screwdriver
- Sealing material (silicone or sealing tape)
- Tape measure and pen
Step 3: Prepare the Cabinet Expose the countertop and decide where you want to place the sink. Mark the position for the sink and faucet.
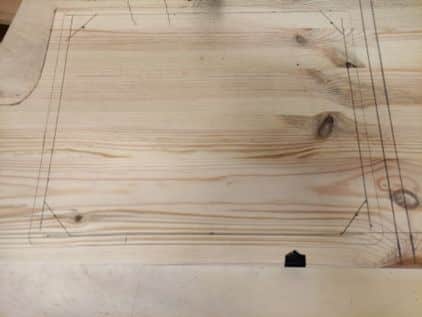
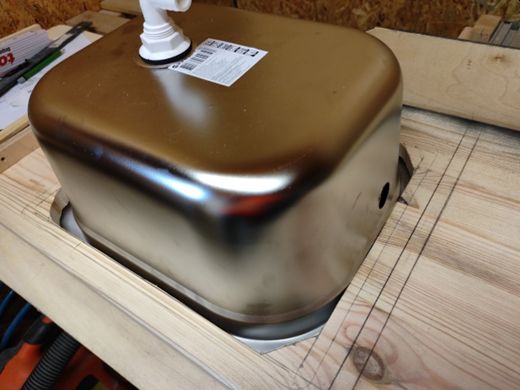
Step 4: Fit the Sink Use a jigsaw to cut a hole for the sink that is large enough to fit it in. Ensure that the sink aligns flush with the surface of the countertop.
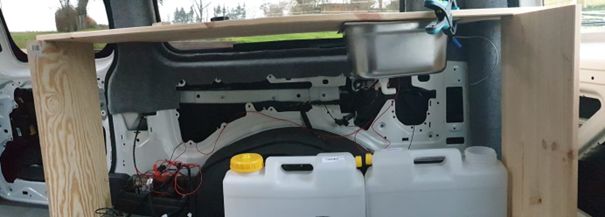
Step 5: Prepare Water Connections Place the freshwater container in the cabinet, ensuring it is easily accessible. Connect the freshwater hoses to the container and the faucet. Ensure that the hoses are securely and tightly connected.
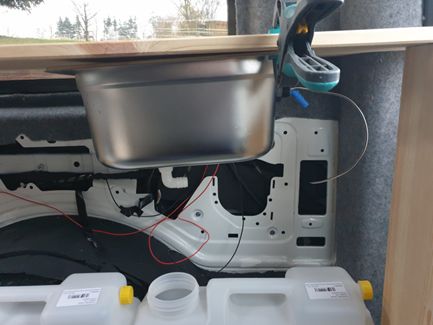
Step 6: Prepare Wastewater Line Place the wastewater container under the cabinet near the sink. Connect the wastewater hoses to the sink and lead them to the wastewater container. Ensure that the hoses are well secured and free of leaks.
Step 7: Install the Submersible Pump Attach the 12-volt submersible pump in the cabinet near the freshwater container. Connect the pump to the freshwater line and ensure it is securely mounted.
Step 8: Install the Faucet Mount the faucet in the designated location in the sink. Ensure it is securely fastened and free of leaks. Depending on the faucet type, it may have an integrated automatic feature or a separate on/off button.
The electronics that power the pump are hidden inside the pump housing and sit at the bottom of our water tank or container. From this housing, a special waterproof cable with 12-volt power extends. We need to connect this cable to our electrical system in the camper to make the pump work and transport water.
The easiest way to do this is by using a so-called “automatic water tap” that has a small switch to control the submersible pump. When you open this tap at your sink, it sends a signal to the submersible pump to transport water. Soon after, the water flows into your sink. Once you close the tap again, the pump automatically turns off, thanks to the integrated switch in the automatic water tap.
For this technique to work, the faucet, the submersible pump, and the 12-volt system in the camper need to be connected. But don’t worry, it’s not particularly complicated. There are even prefabricated sink kits with an automatic water tap and pre-wired 12-volt lines that you can buy for around 100 euros.
Step 9: Inspection and Sealing Before putting the system into operation, check all connections for leaks. Ensure there are no leaks that could lead to water loss.
Step 10: Test Run Turn on the 12-volt submersible pump and open the faucet to ensure that water flows properly. Check if wastewater flows into the wastewater container.
Step 11: Completion If everything is working flawlessly and there are no leaks, you can securely close the cabinet. Your camper sink is now ready for use, allowing you to comfortably wash dishes and use fresh water in your mobile home wherever you are.
The Cooler Box
There are several ways to cool food in the camper, depending on your needs and specific requirements for space and energy efficiency. Here are some common methods:
- Compressor Cooler Box: A compressor cooler box is one of the most efficient options for campers. It works similarly to a traditional refrigerator and can keep food at low temperatures regardless of the outside temperature. It comes in various sizes and can be used as a refrigerator or freezer. The main advantage is reliable cooling performance, regardless of environmental conditions. However, it consumes more power and may be more expensive than other options.
- Thermoelectric Cooler Box: Thermoelectric cooler boxes are cost-effective and require less power than compressor cooler boxes. However, they do not cool as strongly and are better suited for use in milder climates. They are a good choice if you only need to keep food cool occasionally.
- Absorption Cooler Box: Absorption cooler boxes are quiet and can be powered by various energy sources, including gas. They are particularly useful when camping far from civilization with no access to electricity. However, they are not as efficient as compressor cooler boxes and may take longer to cool food to the desired temperature.
- Passive Cooling: This method uses cooling elements, ice, or freezer packs to cool food. It is simple and does not require a power source. You can use these elements in a conventional cooler or cooler bag. However, the cooling effect lasts for a limited time, and you need to regularly get fresh ice or cooling elements.
Recommendation: If you’re looking for a reliable cooler box with high performance, I would recommend a compressor cooler box. A popular option is the Dometic CFX series, offering various sizes and functions. They are energy-efficient, quiet, and can be used as both a refrigerator and a freezer. Of course, the best choice depends on your budget and individual requirements. Remember to consider power consumption and size in relation to your camper and planned power usage.
Drawers in the Camper
Drawers are as essential in camper construction as they are in your home. They provide storage space for everything from cooking utensils to clothing and travel essentials. But before diving into building drawers, consider some important factors:
- Size and Placement: Determine what you want to store in the drawers. Measure the available space carefully so that the drawers fit perfectly. Also, consider the height of the drawer front to open them easily, even if there are cabinets above.
- Weight: Take into account the weight of the items you want to store in the drawers. Heavy items require robust drawer slides. Partial extension or full extension slides are suitable depending on how far you want to open the drawers.
- Self-Closing Drawers: Self-closing drawers are highly practical in camper construction. They prevent drawers from opening during travel, ensuring everything stays securely in place.
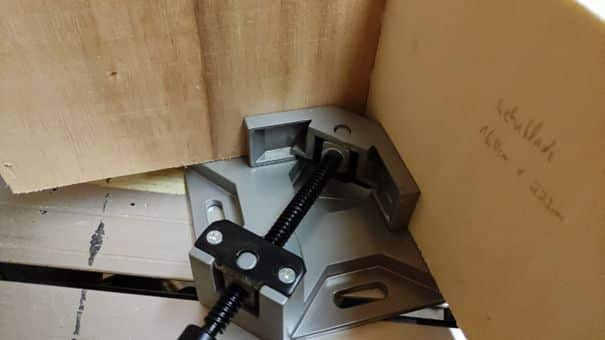
- Material and Craftsmanship: The choice of material for your drawers is crucial. Plywood sheets are an excellent choice as they are stable and lightweight. Ensure that the edges of the drawers are well-crafted to avoid injuries.
- Extension Length: Depending on how much of your drawer content you want to see, there are different extension lengths to choose from. However, keep in mind that longer extensions may take up more space in your camper.
- Drawer Slides: Opt for high-quality drawer slides that ensure smooth movements. Damped drawer slides are a great choice as they close gently and quietly.
- Number of Drawers: Plan carefully how many drawers you need and where to place them. Remember, they should be easily accessible if you want to make the most of them.
- Design and Aesthetics: Drawers can be both functional and stylish. Consider how you want to design them to add a personal touch to your camper.
When choosing drawers and drawer slides, prioritize quality and functionality. They should not only look good but also last long and make your camper life more convenient.
There are various types of drawer slides, and choosing the right one depends on your individual needs and requirements for the camper conversion. Here are some common types of drawer slides and recommendations on when they are best used:
- Full Extension Drawer Slides:
- Recommended Use: These drawer slides offer the most complete extension, allowing you to easily access the entire contents of the drawer. They are ideal for kitchen cabinets and storage spaces in the camper where you want to optimize space usage.
- Partial Extension Drawer Slides:
- Recommended Use: Partial extension drawer slides work well for drawers that are not very deep or where you don’t need to see the entire content. They are a space-saving option for camper conversions.
- Self-Closing Drawer Slides:
- Recommended Use: Particularly practical in moving vehicles like campers, self-closing drawer slides ensure that drawers gently and quietly latch when closing. This is important to prevent accidents and disturbances while driving.
- Self-Locking Drawer Slides:
- Recommended Use: Self-locking drawer slides are useful when you want to prevent drawers from unintentionally opening during the journey. They provide additional safety and stability.
- Soft-Close Drawer Slides:
- Recommended Use: Soft-close drawer slides are perfect if you prefer a slow and gentle closing motion. They prevent drawers from slamming loudly, ensuring a quiet closing, which is especially pleasant in living areas of your camper.
- Undermount vs. Side Mount:
- Recommended Use: The choice between undermount and side mount installation depends on the construction of your cabinets and drawers. Undermount installation saves space and provides a clean look, while side mount installation can be more stable in some cases.
Choosing the right drawer slides is crucial for ensuring functionality, safety, and convenience in your camper. Consider the specific requirements of each area where the drawers will be used to make the best decision for your camper conversion project. Pay attention to the quality of the drawer slides and consider the type of material you plan to store in the drawers. Also, keep in mind that camper drawer slides should generally be compact and sturdy to accommodate limited space and movements during travel.
Installing Drawers in Your Camper: A Step-by-Step Guide
Step 1: Measurements and Planning Before you start the installation, carefully measure the available space and plan the drawers accordingly. Ensure that the drawers fit well in the designated openings and leave enough space for drawer slides. Consider the thickness of your slides. Measure the width inside the furniture for the drawer. Subtract twice the thickness of your slides (since you’ll be using two slides).
Step 2: Prepare Materials and Tools Make sure you have all the necessary materials and tools ready. You’ll need drawer slides, plywood or plywood sheets for the drawers, screws, a drill, screwdriver, level, pencil, and a saw.
Step 3: Mount Drawer Slides Attach the drawer slides to the drawers, ensuring they run evenly and parallel. This step is crucial for the stability and functionality of the drawers.
Step 4: Mark Drawer Positions Make markings on the inside of the furniture where the drawers will be placed. Ensure that the positions are precisely aligned both horizontally and vertically.
Step 5: Install Drawer Slides Attach the drawer slides inside the furniture, positioning them along the previously marked lines. Use a level to ensure they are perfectly straight. Securely screw the slides to ensure stability.
Step 6: Insert Drawers Insert the drawers into the drawer slides. Ensure they slide in and out smoothly without catching or jamming. Adjust the height of the drawer slides to ensure the drawers fit perfectly.
Step 7: Adjustment and Alignment Check the alignment of the drawers to ensure they sit perfectly both horizontally and vertically. You can adjust the drawer slides to compensate for minor irregularities.
Step 8: Attach Drawer Fronts Attach the drawer fronts to the drawers. Ensure they are flush and stable. You can use concealed hinges or damped hinges to secure the fronts.
Step 9: Test Test the drawers to ensure they function flawlessly. Do they open and close smoothly? Are they stable and secure?
Step 10: Finish and Finishing Touches If everything works well and the drawers fit perfectly, you can customize the furniture surfaces according to your taste. You can paint, oil, or apply a finish of your choice.
That’s it! With these steps, you should be able to successfully install drawers in your camper. Remember that precision and patience are crucial to ensure the drawers function well and seamlessly integrate into your camper.
