One of the best choices we made for our camper conversion was installing a solar panel. This panel powers our camper battery, providing us with almost limitless independence from campsites or external power sources. The benefits of solar power for your camper’s electricity supply are numerous and highly convincing. Especially in modern Euro-6-standard vehicles, equipped with intelligent alternators and Battery Management Systems (BMS), independence from the alternator becomes increasingly crucial.
In older cars, it’s straightforward: the alternator charges the battery when the engine runs. Once the battery is full, the charging stops. In these vehicles, charging the camper battery with the alternator is simple.
However, in newer Euro-6-standard cars, it’s more complex. These vehicles have an intelligent alternator connected to a Battery Management System in the car. These modern cars are designed to consume as little fuel as possible. This means the alternator doesn’t generate additional power when the starter battery is already fully charged. This makes it more challenging to charge the camper battery in the camper, as was the case with older vehicles.
Why Did We Choose Solar Power?
- Complete Autonomy: With a solar panel, we’re entirely independent of campsites or external power. This means wherever we park our camper, we have our own power source.
- No Hookup Worries: We don’t need to worry about whether the campsite has a hookup or not. Our camper is always self-sufficient.
- Extended Power Supply: Thanks to our well-sized battery capacity, we can go for several days without an external power source. This gives us the freedom to camp off the beaten path without sacrificing the convenience of electrical devices.
How Does Solar Charging Work?
The principle is relatively simple. The solar panel on our camper’s roof captures sunlight and converts it into electrical energy. This energy is then fed into our camper battery and stored there. From the battery, we can power our electrical devices like lights, fans, refrigerator, and more.
Advantages of Solar Charging:
- Environmentally Friendly: Solar power is a clean and eco-friendly energy source, contributing to preserving the environment and reducing our carbon footprint.
- Cost Savings: With a one-time investment in a solar panel, we save money in the long run as we no longer have to pay campsite fees for electricity.
- Maintenance-Free: Solar panels typically require very little maintenance. Once installed, they work reliably and almost maintenance-free.
- Reliable Energy Source: As long as the sun is shining, we have a reliable energy source. This gives us the assurance that we always have enough power to sustain our camper operations.
In conclusion, opting for a solar panel has proven extremely advantageous. We can enjoy our camper adventures in complete independence while harnessing the benefits of clean, eco-friendly energy. Solar power is a fantastic solution for campers aiming for autonomy and sustainability.
Solar Panels for Your Camper: Which Type is Right for You?
Choosing the right type of solar panel is a crucial step in setting up your solar-powered camper system. Here, we present the three most common types and provide you with their advantages and disadvantages so that you can make the best decision for your needs.
- Polycrystalline Cells:
- Advantages:
- Cost-Effective: Polycrystalline solar panels are often more budget-friendly.
- Durability: They have a good lifespan and can last for many years.
- Disadvantages:
- Lower Efficiency: Compared to other types, polycrystalline cells often have a slightly lower efficiency, meaning they generate less power per unit area.
- Weaker Performance in Low Light: They are less efficient in diffuse sunlight or poor weather conditions.
- Advantages:
- CIS Type Cells (Copper-Indium-Selenium):
- Advantages:
- Efficiency in Low Light: CIS solar panels can perform better in cloudy skies or diffuse sunlight than polycrystalline modules.
- Flexibility: CIS modules are lighter and more flexible, making installation on various surfaces easier.
- Disadvantages:
- Higher Cost: CIS modules are often more expensive to purchase.
- Lower Efficiency: Compared to monocrystalline modules, CIS cells have lower efficiency.
- Advantages:
- Monocrystalline Cells:
- Advantages:
- High Efficiency: Monocrystalline solar panels typically have the highest efficiency, generating more power per unit area.
- Efficiency in Low Light: They are more efficient in diffuse sunlight or poor lighting conditions.
- Disadvantages:
- Higher Cost: Monocrystalline modules are often more expensive to purchase.
- Rigidity: They are less flexible and require a flat mounting surface.
- Advantages:
Choosing Between Rigid and Flexible Solar Panels: Another crucial factor in selecting your solar panel is deciding between rigid and flexible modules. Here are the pros and cons of both options:
Rigid Solar Panels with Frames:
- Advantages:
- Optimal Ventilation: Mounting on spacers allows good airflow under the module, supporting efficient power generation.
- Consistent Performance: Rigid modules maintain their performance better even at higher temperatures.
- Disadvantages:
- Increased Height: Due to the frame and spacers, the module’s height on the roof is elevated.
- Higher Wind Vulnerability: Due to the increased profile, rigid modules are more susceptible to wind loads.
Flexible Solar Panels:
- Advantages:
- Low Profile: Flexible modules are flat and add minimal height to the roof, crucial for height restrictions.
- Lightweight: They are lighter than rigid modules.
- Disadvantages:
- Lack of Ventilation: Since they are directly glued to the surface, there’s no airflow underneath, leading to more heat buildup and potential performance losses.
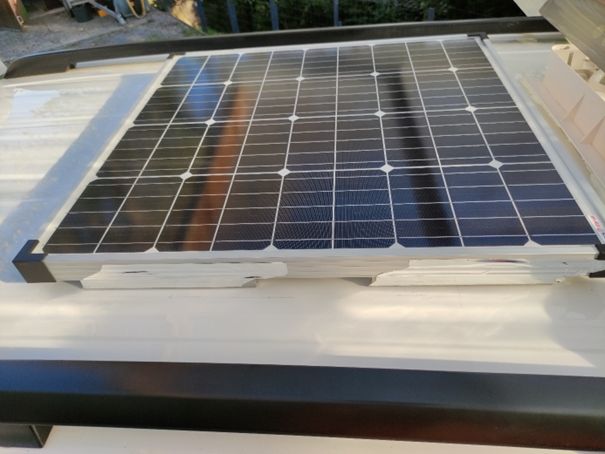
In our case, we opted for a rigid solar panel with monocrystalline cells. This choice provided optimal ventilation and efficient power generation, even in higher temperatures. Ultimately, the choice of the right solar panel depends on your individual needs and preferences.
Calculating the Power Needed for Your Camper’s Solar System
When planning your solar-powered camper setup, it’s crucial to dimension the power of your solar panels according to your energy requirements. Here are some key considerations:
- Rated Power of Solar Panels:
- The rated power of solar panels is typically given in watts (W). For example, a 100-Watt module has the capacity to generate 100 watts per hour or 8.33 ampere-hours (Ah) under optimal conditions. However, optimal conditions are not always present in reality.
- Considering Efficiency:
- Optimal conditions for solar power generation include direct sunlight at the correct angle on the solar panel. In reality, several factors can influence the efficiency of solar panels:
- Cloud cover
- Shading from trees or buildings
- Tilt and orientation of solar panels
- Temperature (solar cells are less efficient at high temperatures)
- Therefore, it’s important to include a safety factor in your power calculations to ensure you can generate enough energy.
- Optimal conditions for solar power generation include direct sunlight at the correct angle on the solar panel. In reality, several factors can influence the efficiency of solar panels:
- Calculating Daily Demand:
- To calculate the power needed for your solar system, you first need to determine your daily energy demand, which can vary depending on the devices and consumers you use. For example, a 40-Watt cooler running for 10 hours a day would consume 400 watt-hours (Wh) per day. If you also use LED lamps totaling 15 watts for 4 hours each night, add another 60 Wh (15 W x 4 h). In total, you need 460 Wh (400 Wh + 60 Wh) per day.
- Considering Sunlight Hours:
- The number of sunlight hours per day varies depending on the season and location. In your example, the sun effectively shines for 4 hours per day in summer. In spring and fall, it might be only 1.5 hours in Germany.
Calculating the Required Power for the Solar System:
- Summer (4 hours of sun):
- To cover your daily demand of 460 Wh, you need a solar module with a power of:
- 460 Wh ÷ 4 h = 115 Watts
- To cover your daily demand of 460 Wh, you need a solar module with a power of:
- Spring/Fall (1.5 hours of sun):
- In these seasons, due to limited sunlight hours, you need a higher power to meet your daily demand. Calculate the required power as follows:
- 460 Wh ÷ 1.5 h = 307 Watts
- In these seasons, due to limited sunlight hours, you need a higher power to meet your daily demand. Calculate the required power as follows:
Conclusion: To ensure you can meet your daily energy needs in the camper, you should choose a solar module with a power of at least 115 Watts for summer and 307 Watts for spring/fall. This allows you to generate enough energy even when conditions are not optimal.
Why is a Charge Controller Necessary for Your Solar-Powered Camper?
A charge controller, also known as a solar charge controller, is a crucial component in a solar-driven camper system. Its main function is to monitor and control the battery charging process, preventing both overcharging and deep discharging. Here are the reasons why a charge controller is necessary:
- Prevents Overcharging:
- Solar panels can generate more energy than the battery can absorb, especially in suboptimal conditions. A charge controller ensures the battery is not overcharged, preserving its lifespan.
- Efficient Solar Energy Utilization:
- A good charge controller optimizes the energy transfer from solar panels to the battery, ensuring that as much of the generated energy as possible is utilized.
Difference Between PWM and MPPT Charge Controllers: There are two main types of solar charge controllers: PWM (Pulse Width Modulation) and MPPT (Maximum Power Point Tracking).
- PWM Charge Controllers:
- PWM charge controllers are cost-effective and easy to use.
- They cut off charging when the battery is nearly full to prevent overcharging.
- However, they do not efficiently utilize the full power of solar panels and are best suited for smaller systems with lower energy demands.
- MPPT Charge Controllers:
- MPPT charge controllers are more expensive but offer significantly better energy efficiency.
- They track the maximum power point of solar panels and adjust the voltage to achieve maximum power regardless of battery conditions.
- This enables optimal use of solar energy and is ideal for larger systems or campers with higher energy needs.
For camper vans requiring a reliable and efficient solar setup, I recommend an MPPT charge controller. This allows for the best possible utilization of solar energy, especially if you have larger batteries and higher energy requirements.
A well-known and high-quality manufacturer of MPPT charge controllers is Victron Energy. Their “Victron SmartSolar MPPT Charge Controller” is a popular choice for campers, offering various models based on power needs. Ensure that the selected charge controller matches the power of your solar panels and battery for optimal results.
Installing Your Solar Panel – The Crucial Step Towards Independent Camper Living
Mounting a solar panel on your camper is a crucial step to achieving independence and fully enjoying the freedom of the road. We understand that this process may initially seem complex for many.
Enter our online course! Our course is designed to guide you step by step on how to effortlessly and safely mount your solar panel, even if you have no prior knowledge of electrical or solar technology.
What to Expect in Our Course:
- Step-by-Step Instructions:
- Our videos walk you through each step of the installation, from preparing the roof area to securely attaching the solar panel.
- Practical Demonstrations:
- We show you precisely how to use the necessary tools and materials to get the job done right.
- Safety First:
- We prioritize safety and show you how to work safely, avoiding potential hazards.
- Expert Tips and Tricks:
- Drawing from years of experience in camper conversions, we share insider tips and tricks to ensure your solar system functions optimally.
- Community Support:
- You’re not alone! Our community is ready to answer questions and exchange experiences.
Why Our Course is the Right Choice:
- Flexibility:
- You can complete the course on your own schedule and revisit it as often as you like.
- Available on Various Devices:
- Our videos are accessible on PC, tablet, and mobile, allowing you to learn conveniently wherever you are.
- VR Option:
- For an immersive experience, we offer support for VR headsets from Oculus, Pico, VIVE, Google Cardboard, and VR Box.
- Creative Freedom:
- We encourage you to bring your own ideas and customize your camper according to your preferences.
Embark on the journey to independence! Installing a solar panel is a significant step towards complete self-sufficiency. With our course, you have everything you need to successfully master this step and enjoy the benefits of a solar-powered camper. Let’s explore the road together – safely, environmentally friendly, and with the freedom you deserve!
Making the Right Connection: Preparing Your Solar Panel for Connection
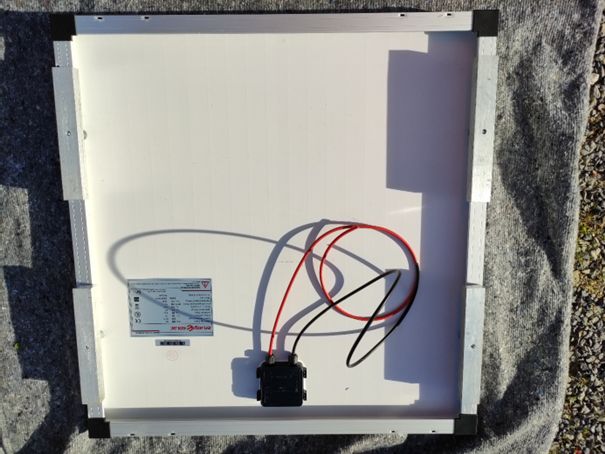
Before converting sunlight into electricity, it’s essential to temporarily cover the solar panel on the roof to prevent unintended electrical generation. This prevents potential issues such as short circuits and protects your equipment.
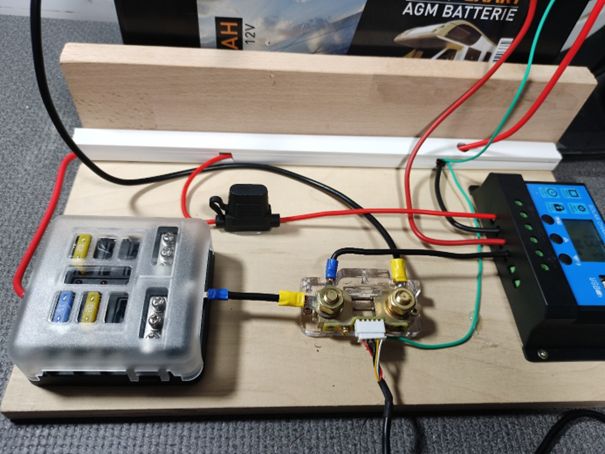
However, the actual connection is straightforward: plus to plus and minus to minus. The cables leading from the solar panel on the roof to the interior are connected to the corresponding terminals on the solar charge controller. From the charge controller, the cables then continue to the camper’s auxiliary battery (plus and minus, possibly to the shunt as described above).
Modern solar charge controllers have three inputs and three outputs, including the “LOAD” option. Remember that the plus cable after the camper’s battery’s plus pole must be fused. Using a blade fuse holder is recommended in this case.
Once all connections are securely made, the cover on the solar panel can be removed. Now, with the help of the charge controller, the battery should be able to charge via the solar panel, provided there is sufficient daylight and sunlight.
To ensure that the camper battery is indeed charging, you can use a current meter. While traveling, such a device is extremely useful for detecting potential electronic issues early.
Another practical monitoring option is the Bluetooth connection between your smartphone and the charge controller, if your charge controller supports such a function. This way, you can check the charging status at any time and ensure that your battery is being efficiently charged.
With these simple steps, you connect your solar panel safely and effectively to your battery, making you well-prepared for independent adventures!