To save space, building a pull-out bed for your camper is a fantastic idea! The bed consists of a fixed part (the sofa) and a pull-out part. Let’s start with building the fixed part. Here’s a step-by-step guide on how to create the fixed part of the bed using the described materials:
Step 1: Take Measurements
Okay, we know you want to make this as precise as possible, but be prepared to let go of that notion. Your camper van may look straight at first glance, but in reality, the sides of the body are as round as a donut. So, make your measurements as accurate as possible, but trust that you’ll still need to make some adjustments in the end.
Step 2: Cut Multiplex Sheets
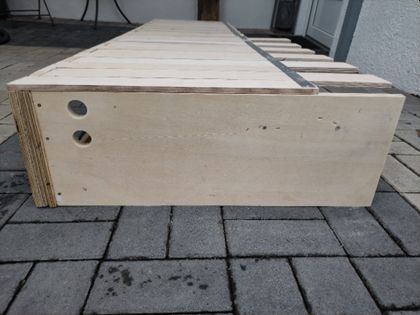
This is where you prove your courage. Grab your carefully selected multiplex sheets. Using a jigsaw or circular saw (don’t forget your safety goggles and ear protection; you don’t want to look like a screaming lumberjack), cut the sheets according to your measurements. Two sheets for the sides, at least one for stability in the middle. Cut holes in the sides if you want compartments to store things later.
Step 3: Attach Connecting Pieces
Now it gets tricky. These thin plywood or multiplex sheets come into play. They are somewhat like the backbone of your bed. Attach them between the side pieces at right angles, or else your bed will look like a leaning Tower of Pisa. Screw them tightly, and remember that “flush” should be your mantra.
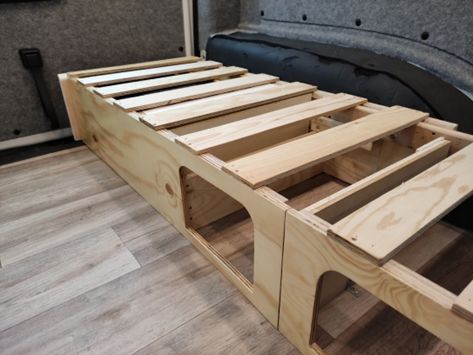
Step 4: Assemble the Bed Slats
Place the bed slats on top of the fixed bed frame and secure them with glue and screws. After all, you wouldn’t want to end up on the floor while sleeping, right? Make sure the bed slats are securely and evenly attached to the frame.
Step 5: Sanding and Finishing
Now comes the fun part—sanding fun. Smooth out all visible edges and surfaces of the bed frame to eliminate possible unevenness. You can paint or oil the surface according to your preferences, protecting it from moisture and wear. Remember that you can unleash your creativity here!
Step 6: Test Stability
Before you throw yourself onto your new bed (figuratively), make sure the fixed part of the bed is stable and secure. It would be quite embarrassing if it collapsed under you, wouldn’t it?
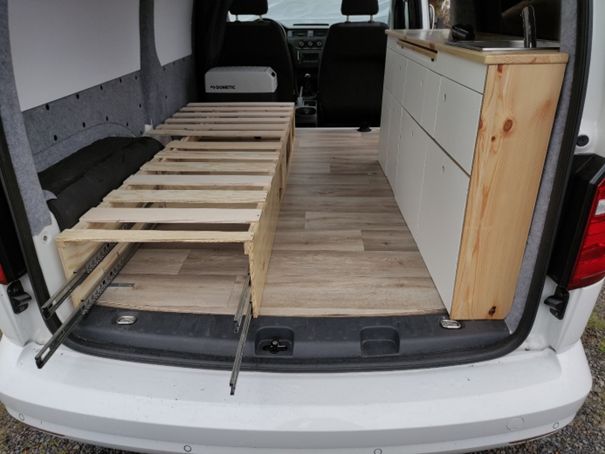
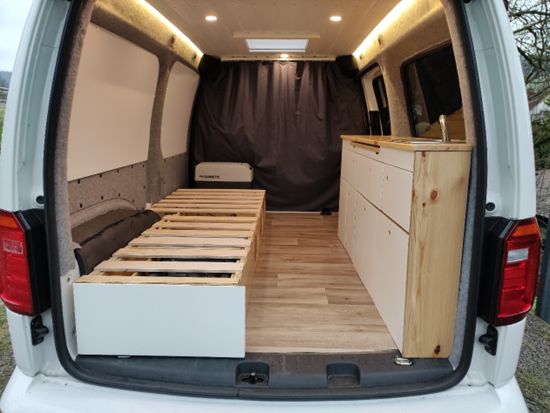
Step 7: Placement in the Camper
Install your freshly built bed in your camper at the desired location. Secure it to the body or to the designated anchoring points in your vehicle. Now you finally have a cozy sleeping spot for your adventures.

Step 8: Add a Pull-Out Drawer (Optional)
You probably think your newly built bed is already pretty cool, right? But how about taking it up a notch? Let’s add a pull-out drawer that opens when you swing open the back of your vehicle! This space could be perfect for storing kitchen utensils, like a camping stove, for example.
Step 8.1: Constructing the Pull-Out Drawer
Let’s start building the pull-out drawer. You’ll need additional plywood panels and full-extension slides for this feature. Measure the available space precisely and build the drawer to fit perfectly in the open area beneath the fixed bed section.
Step 8.2: Attaching the Slides
Attach the slides for the pull-out drawer to the sides of the bed frame. Ensure the slides glide smoothly, making your drawer easy to pull in and out.
Step 8.3: Testing the Pull-Out Drawer
Test the pull-out drawer to make sure it works smoothly. It should easily extend when you open the back, and slide back under the fixed bed section when you close it.
Step 8.4: Sanding and Finishing
Just like the fixed bed section, sand the drawer and paint or oil it according to your preferences. Don’t forget to let your creativity flow!
Step 8.5: Placing in the Camper
Now, install the entire bed structure in your camper, making sure the pull-out drawer fits perfectly into the back door. Secure everything in place at the designated anchor points.
Step 9: Smart Additions to Your Bed
Now that your bed is almost ready, let’s add some clever enhancements. We know that comfort and functionality are everything in camper life!
Step 9.1: Preparation for Cigarette Lighter or Light Switch
In the headboard of your bed, prepare some holes to later install a cigarette lighter or a light switch. This can be especially useful if you want to connect additional lighting or devices. Mark the spots where the holes should be drilled.
Step 9.2: Drilling Holes
Use a drill to make the holes you marked in the headboard. Make sure the holes are large enough to accommodate the cigarette lighter or light switch.
Step 9.3: Installing Outlet or Switch
Attach the cigarette lighter or light switch into the prepared holes and connect it according to the manufacturer’s instructions. Ensure everything is secure and well-insulated to avoid electrical issues.
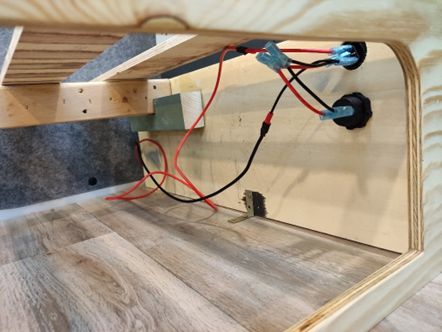
Step 9.4: Testing and Final Touches
Test the functionality of your cigarette lighter or light switch to ensure everything works smoothly. After that, you can further customize, sand, and paint the headboard according to your preferences.
Step 9.5: Enjoy Your Comfort
With these additional amenities in your bed, you’re well-equipped to make yourself comfortable no matter where your camper adventures take you. Relax, turn on the light, or charge your devices – that’s true camper comfort!
Step 10: The Pull-Out Part of Your Bed
Now comes the exciting part – the pull-out bed! If you want more sleeping space or just a place to relax, follow these steps to build the pull-out part of your bed.
Step 10.1: Prepare the Side Panels
First, prepare the two side panels that will support the pull-out section. They should be as high as the fixed part of your bed. Smooth the edges and ensure they fit well with the existing side panels.
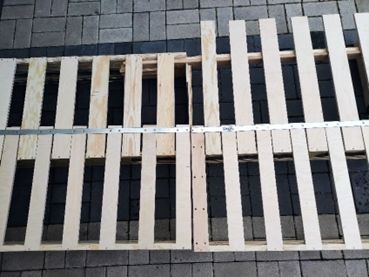
Step 10.2: Cut the Slats for the Pull-Out Section
The slats for the pull-out section will consist of individual pieces that attach to a sturdy frame. Cut the slats to the right length so that they fit precisely into the pull-out area.
Step 10.3: Build the Slatted Frame
Build the frame for the slats by connecting narrow wooden slats. Ensure the spacing between the slats is even for uniform support. Secure the slats with screws.
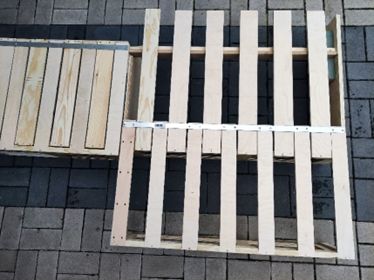
Step 10.4: Attach the Slatted Frame
Attach the cut slats to the frame using glue and screws. Ensure they are securely in place to prevent slipping during sleep.
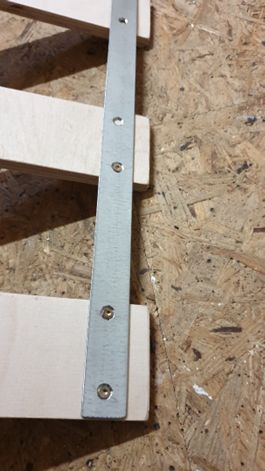
Step 10.5: Secure with Aluminum Rail
Attach aluminum rails to the loose ends of the slatted frame to stabilize it and prevent jamming during extension and retraction.
Step 10.6: Insert the Pull-Out Bed
Now, gently insert the pull-out part of your bed into the fixed part. Ensure it sits securely but can be easily pulled in and out.

Step 10.7: Test Your Creation
Test your pull-out bed by gently extending and retracting it. It should function smoothly and securely sit in the brackets.
Step 10.8: Enjoy Your Additional Space
Congratulations! You now have a pull-out bed that provides more room and flexibility in your camper. Easily pull it out when you need more sleeping space and stow it away as needed.
With this pull-out bed, you have even more options to customize and enjoy your camper according to your preferences. Nothing stands in the way of a restful night in your cozy camper now!
