In this guide, we’ll walk you through essential steps for safe and efficient power distribution in your camper van. Starting with a fuse holder as a central point for your 12-volt electrical system, we’ll also explore the optional addition of a battery disconnect switch. We’ll conclude with a practical example, demonstrating how to connect your first electrical device, like an LED lamp, to the camper battery. Learn how to size fuses correctly for optimal protection and performance. Let’s delve into the details together!
The Importance of Fuses in Your Camper
Fuses play a crucial role in your camper’s electrical system for sensible reasons:
- Short Circuit Protection: Fuses prevent dangerous short circuits by immediately interrupting the circuit if two conductors accidentally contact, preventing damage.
- Protection Against Fire Damage: To avoid fires caused by overheated wires, fuses limit current flow in the event of an overload.
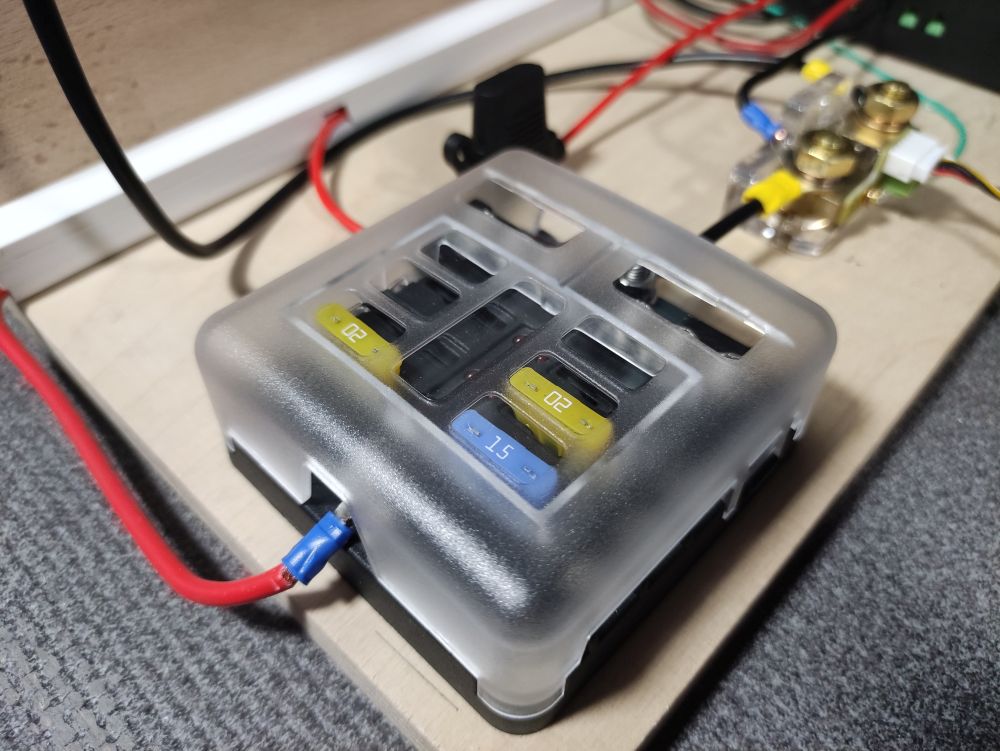
Using a fuse holder with automotive blade fuses is a common and effective method to secure your camper’s electrical system.
Connecting Your Camper Battery to the Fuse Holder
Follow these steps for a secure connection:
- Select the Right Wire: Choose a vehicle-grade wire connected to the positive terminal of your camper battery. Ensure it is appropriately sized to handle the required current without disruptions.
- Connect the Wire to the Fuse Holder: Attach the chosen wire to the fuse holder designed for automotive blade fuses. The fuse holder typically provides a connection point for the positive wire, allowing you to add fuses for various circuits.
- Connect the Negative Terminal: Directly connect the negative terminal of the camper battery to the shunt, a component facilitating power consumption measurement between the battery and electrical consumers.
Adding a Battery Disconnect Switch
Instead of connecting the positive terminal of the battery directly to the fuse holder, you can also incorporate a battery disconnect switch in between. An optional battery disconnect switch can be a highly valuable addition to your camper’s electrical setup because it provides the ability to completely cut off the entire power supply from the camper battery to the electrical consumers in the vehicle. This switch is installed in the main wire between the camper battery and the fuse holder, and its installation is quite straightforward:
- Locate the Spot in the Wire: Identify a point in the line between the camper battery and the fuse holder. Ensure no current flows through the wire at this spot.
- Securely Insulate the Wire: Safely insulate the wire at this chosen spot to prevent current flow during the switch installation.
- Attach Cable Lugs to Both Ends: Attach cable lugs to both ends of the cut wire.
- Install the Battery Disconnect Switch: Place the switch in the wire and secure the ends. This addition allows you to activate or deactivate the power supply conveniently.
With this simple addition, you can activate or deactivate the power supply to your electrical consumers in the camper as needed, which is especially practical when your vehicle is not in use for an extended period. This capability allows you to extend the lifespan of your camper battery and enhance the safety of your electrical installation.
Connecting 12-Volt Electrical Consumers
When connecting your 12-volt electrical consumers to the fuse holder, a precise approach is crucial. Here, we take the example of an LED light to explain step by step how to make this connection safely and efficiently.
- Connection to the Fuse Holder: Start with a suitable vehicle-grade wire, connected to an available terminal on the fuse holder. Do not insert a fuse at this point.
- Adjust the Wire Length: Modify the wire length to reach the next connection point.
- Connection to the LED Light: Run a newly prepared wire from this point to the LED light, connecting it to the positive terminal.
- Ground Connection: From the negative terminal of the LED light, run an equally robust wire to the fuse holder or directly to the negative terminal of the camper battery.
- Insert the Fuse: Finally, insert an appropriate blade fuse into the holder for smooth current flow.
Once voltage is applied, the LED light should illuminate, ensuring a successful connection.
Properly Sizing Your Fuse
Sizing your fuse is critical for safeguarding your electrical system:
- Calculate Current Requirements: Determine the current needs of your consumers based on power (in watts) and voltage (in volts). Choose a fuse slightly higher than the calculated requirement to handle unexpected peak currents.
- Example: For a 40W compressor cooler at 12 volts (40W/12V = 3.3A), a 4-ampere fuse would be suitable.
It’s essential to note that you typically choose a fuse that is slightly higher than the calculated current requirement to cover unexpected peak currents and prevent premature fuse triggering. Usually, you select the next higher standard fuse that is readily available. In this example, a 4-ampere fuse would be suitable.
Choosing the right fuse protects your wiring and consumers, minimizing the risk of overheating and fires in your camper.
AC Power in Your Camper
In a camper with a 12-volt system, typically, only direct current (DC) is available, while most of our everyday electrical devices are designed to operate on alternating current (AC). This can lead to issues, especially when you want to use devices like laptops, chargers, or other household appliances. This is where a mobile inverter comes into play.
What is a Mobile Inverter? A mobile inverter is a device that converts direct current into alternating current. This allows you to operate regular 230-volt household appliances in a vehicle with a 12-volt system. This is particularly handy if you want to work on the go, charge your laptop, or use other electronic devices that typically plug into a wall socket.
Considerations When Choosing a Mobile Inverter:
- Power (Watts):
- The inverter’s power should be sufficient to operate the electrical devices you want to use. Consider which devices you want to use simultaneously and choose an inverter that provides enough watts. For example, a laptop requires less power than a coffee maker.
- Pure Sine Wave vs. Modified Sine Wave:
- Pure sine wave inverters produce a current flow similar to that from the wall socket. They are more expensive but are also more compatible with sensitive electronic devices. Modified sine wave inverters are cheaper but may cause issues with some devices.
- Connections:
- Ensure that the inverter has the right connections for your devices. Most inverters offer outlets, USB ports, and sometimes clamp connections.
- Overload Protection and Safety:
- Check that the inverter has safety features such as overload protection, short circuit protection, and automatic shutdown to protect your devices and the vehicle.
- Size and Mounting:
- Consider the available space in your camper and choose an inverter that fits well into your setup. Some models can be permanently mounted, while others are portable.
A mobile inverter can be a great addition to your camper, providing you with the flexibility to use electronic devices on the go. Remember that the inverter draws power from the vehicle battery, so ensure that your battery is adequately charged. Regularly check if the inverter is turned off when not in use to prevent unnecessary battery discharge.
