The camper battery, also known as the on-board battery, is the indispensable heart of your mobile power supply in the camper. In the world of camper conversions, it goes by many names – on-board battery, RV battery, camper battery, auxiliary battery, or second battery. But no matter what you call it, it always refers to the same thing: the battery installed in addition to your vehicle’s starter battery to provide power for lights and other electronic devices during camping.
Why is this additional battery so crucial? The answer lies in how your vehicle’s starter battery functions. Its primary task is to provide enough power to start the engine. Starter batteries are designed for short but intense bursts of energy needed to operate the starter motor. This is why they consist of many thin lead plates capable of fulfilling this task.
However, here’s the catch: Starter batteries are not suitable for continuous operation and deep discharges. Once the engine is running, the alternator takes over the power supply for the electrical consumers in the vehicle. This means that the starter battery is not designed for the continuous operation of lighting, fridge, and other devices you need in the camper.
Introducing the camper battery. It is specifically designed to deliver slow and continuous energy, making it perfect for camper use. With the on-board battery, you can have lights, charge your smartphone, run the fridge, and more, without worrying about draining the starter battery.
In short, the camper battery is the solution that grants you the freedom to camp independently of external power sources, transforming your camper into a cozy mobile oasis. It’s the key to a comfortable and self-sufficient camping experience.
Choosing the Right Battery for Your Camper: AGM Battery vs. Lithium-Ion Battery
In the realm of camper batteries, two main players take the spotlight: the AGM battery (Absorbent Glass Mat) and the lithium-ion battery, specifically the Lithium Iron Phosphate battery (LiFePo4). Both have their pros and cons, and it’s crucial to make the right choice for your specific needs. Let’s take a closer look:
AGM Battery: The Reliable Workhorse
Advantages:
- Vibration and shock-resistant due to the technology where the electrolyte is absorbed in glass matting.
- Lower internal resistance allowing faster charging, ideal for solar setups.
- Can deliver higher currents, enabling the operation of larger electronic devices through an inverter.
- Maintenance-free and resistant to low temperatures.
Disadvantages:
- Sensitive to deep discharges and high temperatures.
Lithium-Ion Battery (LiFePo4): The High-Tech Option
Advantages:
- Maintenance-free and leak-proof, no risk of explosion.
- Can utilize almost the entire capacity as it can be deeply discharged.
- Three times higher energy density compared to Gel or AGM batteries.
- Not temperature-dependent, almost no self-discharge.
- High cycle life, significantly increasing lifespan.
Disadvantages:
- The price can be a deterrent, as they are more expensive than AGM batteries.
Both types have their strengths and weaknesses. The AGM battery is a reliable choice for the average camper, offering good value for money. On the other hand, the lithium-ion battery is a technological marvel, providing the best performance and lifespan, albeit at a higher cost.
In the end, we opted for an AGM battery as it suited our needs best. However, the right battery choice depends on your specific requirements and budget.
Choosing the Right Battery Capacity for Your Camper: Energy Needs and Calculation
Picking the right battery capacity for your camper is crucial to make sure you have enough power for your needs. To determine the battery capacity, we need to calculate the energy requirement. We do this by using the power (in watts) of the electrical devices and the duration they’ll be in use.
Step 1: Calculate Energy Needs
To calculate energy needs, we multiply the device’s power (in watts) by the time (in hours) it will be in operation.
Example:
- A cooler with a power of 40W running for 10 hours a day needs: 40W x 10h = 400 Wh (watt-hours) per day.
- LED lights with 15W, switched on for 4 hours at night, need: 15W x 4h = 60 Wh per night.
Step 2: Calculate Energy Needs for Two Days
We’ll charge our battery exclusively through solar power. Since you want your battery to last two days without sunlight, we need to calculate the energy requirement for two days. In our example, the daily energy requirement for the cooler is 400 Wh and for the LED lights is 60 Wh. Therefore, we need for two days: (400 Wh + 60 Wh) x 2 = 920 Wh
Step 3: Convert Wh to Ah
Most batteries have a capacity in ampere-hours (Ah), not watt-hours (Wh). To calculate the required capacity in Ah, we divide the required watt-hours by the operating voltage of the battery, usually 12 volts.
Example:
- For 920 Wh / 12 V = 76.67 Ah
Step 4: Consider the Depth of Discharge
AGM batteries should ideally only be discharged to 50%, while lithium-ion batteries can safely go down to 80%.
For our AGM battery:
- 76.67 Ah / 0.5 (50% discharge) = 153.34 Ah
For our lithium-ion battery:
- 76.67 Ah / 0.8 (80% discharge) = 95.84 Ah
Conclusion:
In our example, an AGM battery would need a capacity of approximately 153.34 Ah, whereas a lithium-ion battery would only need about 95.84 Ah to cover the energy needs for two days.
Measuring Battery Capacity: Why Voltage Alone Isn’t Enough
When it comes to measuring your camper’s auxiliary battery capacity, you might think a simple voltage check would do the trick. For AGM batteries, voltage can give you a rough idea of the charge level, but unfortunately, the reality is a bit more complex. Here’s why:
- Voltage During Charging: When your battery is being charged, the voltage measurement reflects the charging voltage, not the actual charge level. This means the voltage can be high even if the battery isn’t fully charged yet.
- LiFePo4 Batteries: Modern Lithium Iron Phosphate batteries often maintain a constant voltage during charging, making it even trickier to gauge the charge state based on voltage alone.
To tackle this issue and ensure a more accurate measurement of battery capacity, enter the “shunt resistor.”
The Role of the Shunt Resistor: Enabling Precise Measurements
A shunt resistor is an electronic component installed in the circuit between the battery and connected devices. It has low resistance and allows for the precise measurement of the current flowing into or out of the battery.
The critical advantage of a shunt resistor is its ability to accurately measure the actual energy consumption and the energy being fed into the battery. This enables an accurate determination of the battery’s charge level, regardless of the current voltage or charge states.
With a shunt resistor and a corresponding battery monitor, you can monitor your auxiliary battery’s exact status at any time. This provides a reliable assessment of available power, allowing you to take timely actions to recharge your battery if it’s running low.
In summary, a shunt resistor offers a more precise and reliable method to monitor your battery’s charge state, ensuring you always have enough power to meet your camper needs.
Installing a Battery Monitor: Step-by-Step Guide
Installing a battery monitor, also known as a battery computer, might seem daunting initially, but with the right steps and a bit of patience, it’s entirely doable. Here’s a step-by-step guide on how to install a battery monitor in your camper:
Step 1: Preparation Before you begin the installation, ensure your auxiliary battery is adequately charged, preferably at 100%.
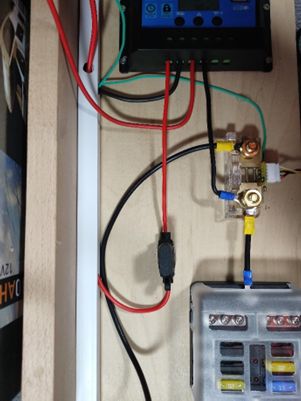
Step 2: Ground Cable or Ground Wire The battery monitor requires a reliable connection to the ground to provide accurate measurements. You can use either a ground cable or an insulated ground wire. The ground cable runs from the negative terminal of your auxiliary battery to the corresponding point on the shunt. Ensure the connection is secure. The shunt has two terminals: one for the connection from the auxiliary battery and one for the consumers. All consumers typically connected to the negative terminal of the auxiliary battery should now be connected to the designated terminal on the shunt. This includes the negative lead from the solar panel, the inverter, and other consumers, as well as the connection to the body’s grounding point. In summary, only the connection from the shunt should be attached to the negative terminal of the auxiliary battery. All other vehicle wires (negative) must be connected to the appropriate point on the shunt.
Step 3: Consider Wire Gauge If you’re using insulated ground wire (single-core FLY automotive wire), ensure an adequate wire gauge. The gauge must be dimensioned according to your electrical concept to safely carry the current.
Step 4: Connecting the Battery Monitor If your shunt comes with a battery monitor, you can easily connect it to the shunt using plug-and-play. If a Bluetooth option is available, your smartphone or tablet serves as the onboard computer. To ensure the shunt can send information to the onboard computer or your smartphone/tablet via Bluetooth, you need to run a wire from the positive terminal of the auxiliary battery to the shunt. The shunt also has an additional input for this wire, and the terminals are labeled. The user manual will guide you in the allocation process.
Step 5: Provide Battery Information To properly customize the battery monitor to your auxiliary battery, it’s best to fully charge the battery beforehand. Once the battery is fully charged, you can enter accurate information about the charge level (usually 100%) and the ampere-hours (Ah) of your battery in the battery monitor’s configuration. Correct information is crucial as incorrect data could lead to inaccurate displays of available battery capacity.
Important Note: The ground wire between the negative terminal of the auxiliary battery and the shunt should be used exclusively for this purpose. Connecting other wires or consumers could distort the measurement results.
With these steps, you can successfully install a battery monitor in your camper, enabling precise monitoring of your battery capacity. This is crucial to ensure you always have sufficient power, allowing you to enjoy your camper adventures worry-free.
